Sergio's Multi-Piece Mayan Jade Ear Flares
Creation time: 250+ hours
Production date: May 2008 - October 2012
Materials used: blue Guatemalan jadeite, sterling silver, henequen (agave fiber string)

For some time now I have been interested in Prehispanic culture and jewelry, and so called "primitive" lapidary. After completing the first of what has become many personal interpretations and historical reproductions of Mayan stone plugs from traditional jadeite, I was interested in tackling the idea of ear flares that involved multiple pieces. I find it interesting that today we generally tend to focus on basic symmetrical outline shapes (not wearing surface but rather the outermost edge contour shape) such as the circle, teardrop or oval. Historically, in quite a few cultures around the world we find that decoration and elaboration of the basic plug form is very important in jewelry design. The traditional Mayan ear flare concept is very exciting to me because the method of construction itself - the process of nesting layers of material, protruding beads and hanging elements - is what creates the aesthetic. The act of solving the problem of balancing huge flares or a long bead, and not having that plug fall forward or the bead droop apathetically, creates a beautiful piece of jewelry that has dimension and movement and bleeds creativity.
After publicly mentioning my interest in tackling this project, I was contacted by a customer named Sergio from California who was very interested in a traditional set of Mayan jade ear flares. Sergio is an incredible painter and tattoo artist that has done many pieces focusing on indigenous Mexican culture, and he has family in Mexico, so it was a unique experience for me to get to make this set of jewelry for someone who would certainly appreciate the historical and cultural perspectives. We decided to replicate a beautiful set of ear flares from a Mayan funerary mask found at the site of Calakmul in the Campeche province of Mexico.

The mask is of green jadeite in typical Maya mosaic fashion, and includes a pair of ear flares carved as four petal flowers with center beads and mock counterweights. Because the flares were funerary in nature and was likely not meant to be worn, it was necessary to do some reverse engineering and take a best-guess approach to recreating the parts of them that cannot be seen. With this in mind we established the goal of the project:
Create a visual likeness to the Calakmul ear flares from a historically correct jadeite material that must be easy to wear and durable enough to be worn daily if the customer wishes.
The jadeite chosen for the project was a very unique blue jadeite from Guatemala. The origin is the same as those jades used by Prehispanic cultures, which were gathered in the Motagua river valley of Guatemala and traded extensively throughout Mexico and Central America.

The first step in the process was to establish sizing: 3/4" (19mm) wearing size with a front flower flare just under 2" (51mm) were the goal dimensions as specified by Sergio. With these numbers in mind I illustrated an initial scale drawing of the flares for our future reference.

Because this jewelry involved very complex curves and we were working from two dimensional photographs, Sergio and I decided the best course of action was to create a mock-up of the ear flares from wood. My first hands-on task was to utilize reference photos to create all of the pieces of the project in wood so that they could be sent to Sergio for a hands-on review.


Sergio also sculpted a clay mock-up exploring the curves and lines so that he could provide initial notes.

We found the first version of the flower flares to be too flat and not rounded or "trumpet" shaped enough so a second piece was created with a thicker cross section along the outside edge, and better curves.


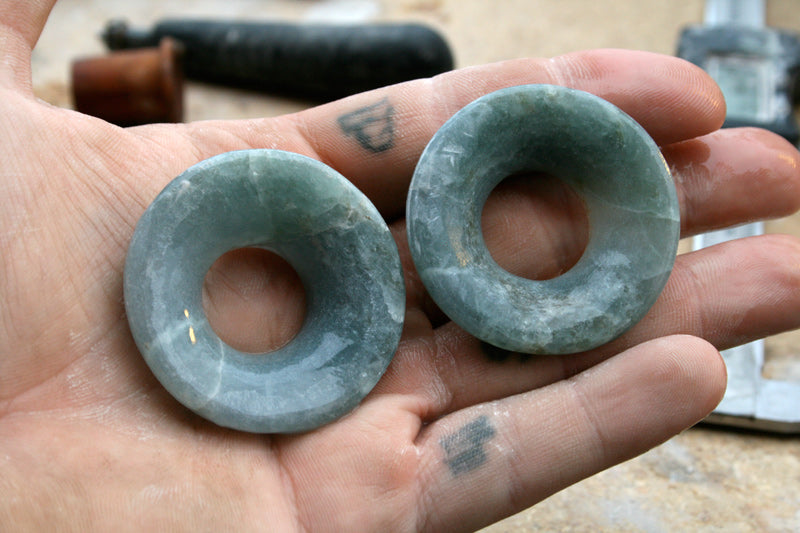
Once we agreed upon the initial forms, it was time to start getting into the dirty work. I began cutting down the stone into blanks needed for each individual piece. The large flower flare portions were the most complex shapes and the largest overall pieces by surface area, so it was necessary to start with those and work downward. After cutting blocks to serve as the initial blanks I began drilling the centers and shaping each flare, one at a time, from about a 2" x 2" x 5/8" block into discs with complex curves and hollow centers
 .
.

The initial holes in all of the pieces were drilled with a combination of diamond coated core drills and 1/4" shank diamond carving bits chucked into my drill press for rough shaping and heavy material removal. Having the ability to move the piece around a fixed tool instead of moving the tool around a hand-held piece really helps me explore curves because I am manipulating an object in three dimensions and "seeing" it with both my eyes and my hands.

Grinding wheels on standard six wheel lapidary grinders were used for a portion of this project (in particular the shaping of the beads) but the vast majority of the elements were carved with diamond points in either a drill press, Foredom flex-shaft carving tool (for 1/4" shank bits due to their bulk) or a high speed dental lab micromotor tool for the fine detail carving.

After the initial shaping I began to start on the curves on the inner portion of the "trumpet" shape and the outer slope from the flare edge down what would be the wearing surface, constantly comparing the jade to the initial wood mock-up that had received Sergio's final approval.


With the first stage of the flower flares beginning to take shape, it was time to finish carving the interior hole to the correct diameter so that the wearing surface model would fit through.

It seems easy to put the round peg in the round hole until you have to do it from one of the hardest stones on earth with pretty serious precision. The fit had to be tight to ensure that all of the pieces (in the end, five per side) would sit properly without sagging from extra room, but the flare also needed to spin freely around the wearing surface so that there would never be a chance of it getting stuck and breaking. These pieces are just over 2mm thick at their thinnest point, and while jade is strong and I certainly like a challenge, I wasn't trying to take any chances. As I'd later discover, the project would end up suffering setbacks of this nature anyway.
With the outer flower flares mostly roughed out and accepting the wood model of the wearing surface, the next step was to create those wearing surface pieces from jade.
![]()
Shortly after the above photo was taken, the first of two breaks of these large flower flares occured. The first break was completely accidental and seriously discouraged further progress. If I remember correctly, it was the flare on the right in the above photo and it broke along some mica inclusions during carving. Not only was this utterly heartbreaking, but it presented a very serious problem - we were working from one unique stone with no back-up that matched it and I still had many pieces to go. I had already cut the blanks for the wearing surface, so my next mission was to go ahead and cut the rough blanks for the beads, which left me with just enough material to cut one thick section of the stone in half horizontally and use up most of the rest of the stone creating two new flower flare portions.
At this point I had one intact flare, one broken flare, and two solid blocks of jade. In an effort to save myself future headache, I did some stress testing on the intact flare (the one on the left) and it snapped in my hands along the white line which starts at the top left. It was at this point that I gave the project a rest on the making side. I went to Sergio offering to close it down because it was taking so long, but I had decided that I was going to finish it anyway and he agreed to sign on for the long haul. I cannot express enough how integral Sergio's patience was to this experimental project.
During the time that it sat idle, I worked for several hours at a time with gaps between. I played it safe drilling the tunnels through the wearing surface pieces and beginning to shape their interiors, and doing light grinding on the new flower flare pieces. I also collected several additional books which showed the mask from multiple views, including a text that a friend brought back from an exhibition in Paris that showed the mask in various stages of being rebuilt along with archeological site photos from the original dig. Seeing some new material renewed my interest in tackling the flower flares again and I began cutting down and shaping a matching set of more durable flares.
While these pieces were being produced, Sergio continued to stretch his ears and this led to an interesting predicament that we had inadvertently already planned for. Part of the retention system for the set was to involve a back plate to serve as a rear flare, and a gold pin which was to go through the wearing surface to secure it. I theorized that as long as his lobe was stretched to a smaller size than the diameter of the back plates themselves, I should be able to keep these pieces in his ears. Perfect!
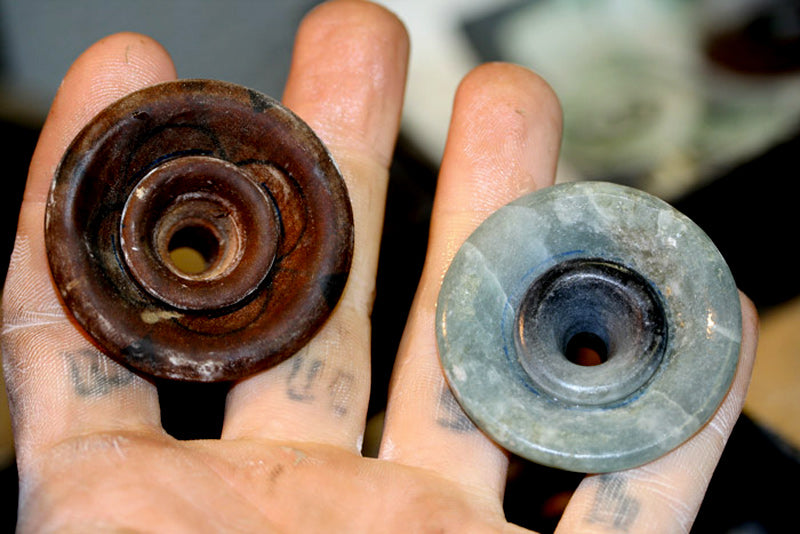
Because I had used the entirety of the original block cutting blanks to replace the broken flares, there was no piece large enough to serve as back plate material. After some inquiring with my jade dealer and going through my own supplies comparing intact pieces and scraps from previous projects, I realized that my dealer had the other half of a piece of jade that was slightly lighter in color but matched the origin and crystal structure quite well. I obtained that stone and cut the back plates (3mm hollow discs) so that I could test to ensure that my theory of sandwiching the lobe between two jade plates would keep the pieces in his ears.


I think Sergio and I were both drawn to this project in part because of the curves and transitions between them. He was very specific in the beginning about these points of the project, and we knew we wanted specific amounts of visual depth and shadow in certain areas. A considerable amount of time was spent fine tuning the radius of the outer edge, the concave curve of the inner portion of the flower flare, the relationship between that curve and the smaller flare at the front of the wearing surface, and the space around the bead and contour of the inner wearing surface tunnel.


Along with fine tuning these details came the need to start finishing some of the smaller pieces so that I could move to test fitting jade against jade. The center beads were a necessity, and I also felt that I should go ahead and start to rough out the petals because they visually effect the other curves.


With things going smoothly and no further breakages, I continued to smooth over the details and bring the various pieces closer to their final rough forms before polish.

I also carved the rough shapes for the counterweight beads. Sergio had provided a previous photo for the design of the counterweight beads, and they were to be modeled after the conch pearl beads hanging from the back of the ruler Pakal's funerary ear flares.


After rough carving the the incised lines along the interior of the flower flares and having all of the pieces in rough form, the project was really starting to come together and I was inspired to work nonstop to complete this jewelry before a planned trip to Mexico for Dia de los Muertos and the opening of the Gorilla Glass body jewelry company's art glass gallery in Oaxaca, Mexico. I knew that I would be visiting the anthropology museums in Mexico City and Oaxaca and I thought it only fitting to wrap up this project immediately prior to that trip.
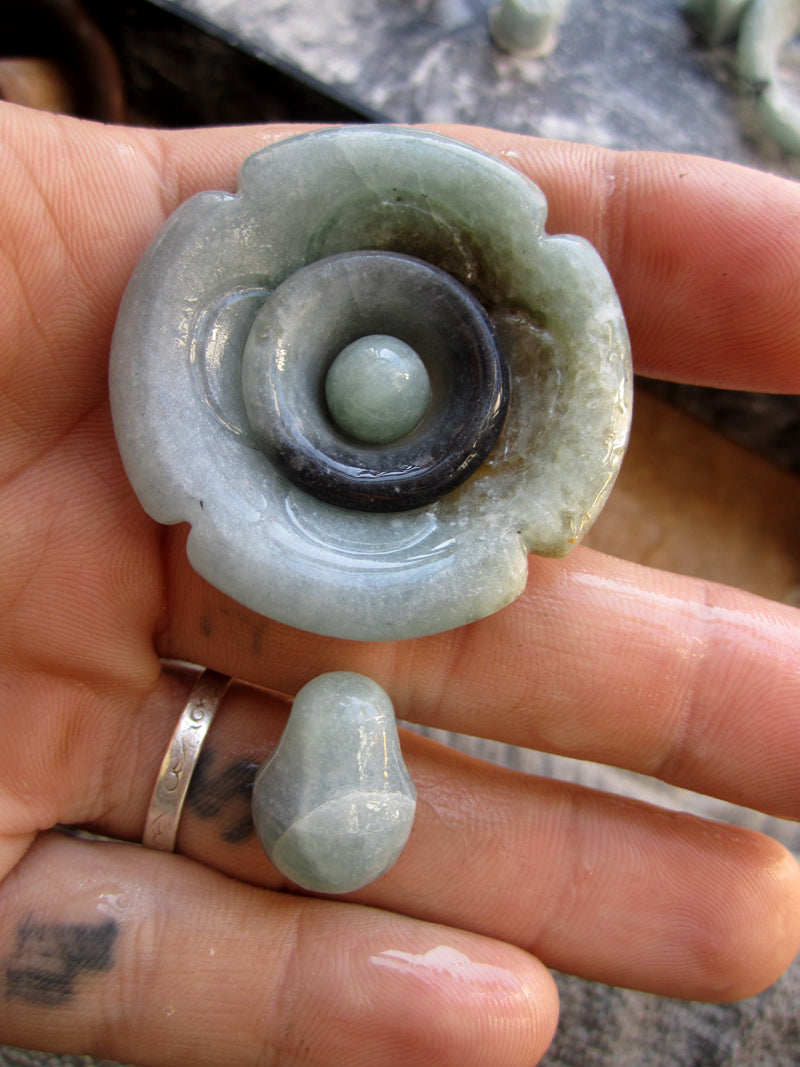
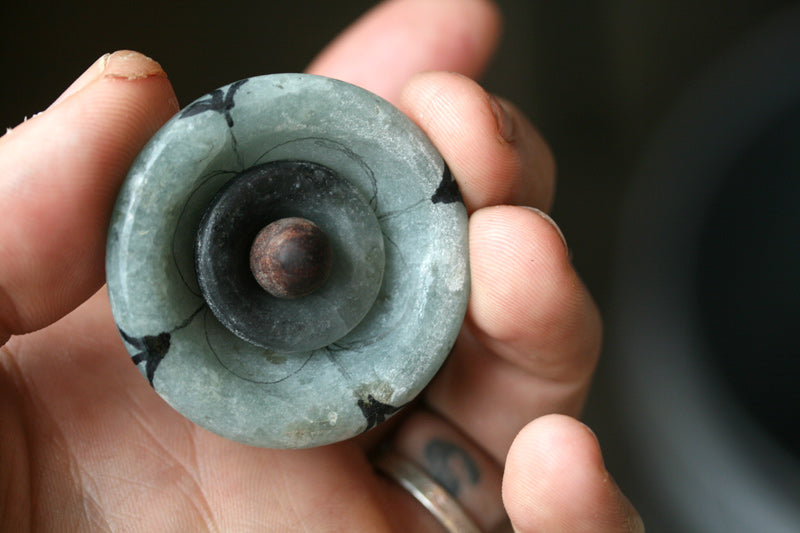
The most pressing issues now became the details of the center bead, counterweight, and retention system. For the center bead, I was interested in a beautiful solution to lacing the traditional henequen (agave) fiber through the bead without it being seen on the front. I accomplished this by drilling the bead horizontally and creating grooved channels on the side that were dual purpose. They allowed me to run the fiber on either side of the bead, and in the process use the countersink to create a tight compression fit between the bead and the tunnel that would keep the bead snug and avoid jade on jade rubbing.


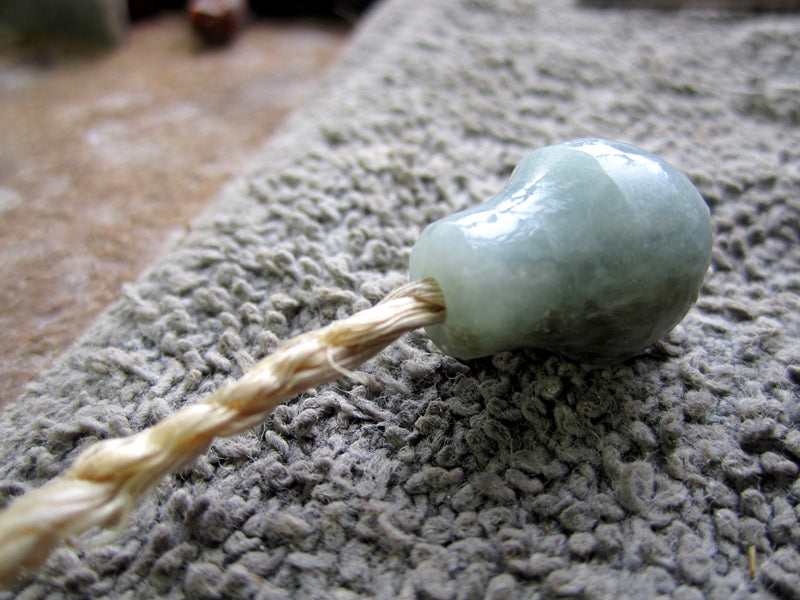
In the same spirit of beautifully simple solutions, I drilled the rear counterweight bead vertically and countersunk the knot at the end into the bead so that it could not be seen during wear or display.
It was at this point that I came to a realization about the original design of the retention system that was just not going to work as planned. With all of the pieces in my hand and feeling the curves, the weight, and how they all fit together, I became apprehensive about the idea of holding the pieces in-ear while blindly inserting a tiny pin into a tiny hole. The thought of dropping one or more pieces, or the jewelry simply being frustrating to wear became an obsession. I thought about this for a couple of days and came up with a wonderful solution.
Because Sergio had stretched his ears and was no longer at exactly 3/4" (at the time of completion he had actually stretched to over 1" in size), it gave me the abilty to modify the wearing surface of the jewelry for a safer retention system. Wanting to come up with the most elegant method possible, I decided to insert a permanent pin into the wearing surface and make the jade pieces themselves a physical part of the retention system. I did a horribly elementary illustration of the entire set and proposed to Sergio that we actually cut notches into the front flower flare and the rear back-plate, embed a fixed silver pin into the wearing surface, and allow them to slide on and lock.

His predictable response was concern about fragility, which I had considered, and I was positive that I could make it work without sacrificing structural integrity. I gave him the option of continuing with the more simple pin idea, with full disclosure about the possible difficulty of putting the set on without help, and the option of the new retention idea with notches and fixed pin. In the end he decided that wearability was one of the most important facets of the project, and I reassured him that I could accomplish that goal with what I thought was a pretty brilliant solution that remained 100% hidden from the viewer to maintain as traditional of an aesthetic as possible. I'm indebted to Sergio for going along with my crazy ideas because this is one of my favorite parts of the project.
The first goal was to create a suitable pin. Using silver tubing and solid silver rod, I created small pins with a larger visible portion and a step-down to be inserted through a hole in the jade and riveted on the interior. This was a serious decision because it involved using a hammer handpiece for setting gemstones to beat the silver into a depression on the inside of a hollow jade cylinder. To be completely frank, it was a really stupid idea but I had no doubt it would work. By this time I had spent many, many hours with my hands on this jade and especially after the earlier breakage I was sure my hands knew it well. I took measurements, drilled the hole in the wearing surface through which the pin would be inserted, created countersinks on both sides (one for the head of the pin to sink into on the outside, and one for the silver to be displaced into on the inside) and got to work.

Finishing this stage was one of those moments where I step back, let out a big "whew" and think "I can't believe that actually $*&^$& worked."
Those moments are part of where it is all about for me. No progress without risk, right?
With the pins in place, I needed to notch the flower flares and the back plates. I knew the back plates could take it no problem, and I was worried about the flower flares until I realized that due to the curve, I really wouldn't be removing that much material. They both worked out perfectly.


With the notches cut and all of the pieces fully carved and most of the details accounted for, it was time to address the surface finish. Most stone body jewelry that I make is polished to a glassy shine, but I felt that a wet look on these pieces when assembled would not be an ideal finish considering the historical perspective. I decided to finish them almost completely by hand to achieve a finish that was shinier than matte but not super reflective. Over the course of the next several days I hand sanded all 10 pieces to a suitable finish with sandpaper and prepared them for final assembly.


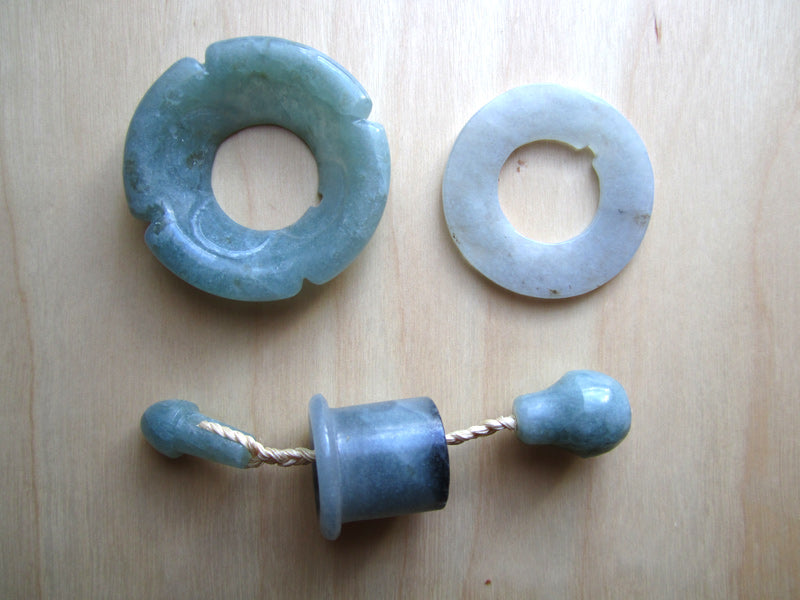
Satisfied with the fit and finish of all of the individual pieces:
- 2 Flower Flares
- 2 Wearing Surface
- 2 Center Beads
- 2 Counterweights
- 2 Backplates
It was time to lace everything together with the traditional fiber, and this is where my skills end and I needed the help of an expert. I must give credit where it is due. My wife Suzanne is an incredible fiber artist, with crochet and knitting skills that landed her as a finalist in a recent Vogue Knitting magazine contest and participation in a Vogue knitwear fashion show in NYC. I have chubby, beat up lapidarist fingers, but her hands are accustomed to working with delicate fibers. She was enlisted to do the four strand braid that resulted from doubling the henequen over inside the tunnel and then splitting it into strands for a braid to fit through the counterweight bead.
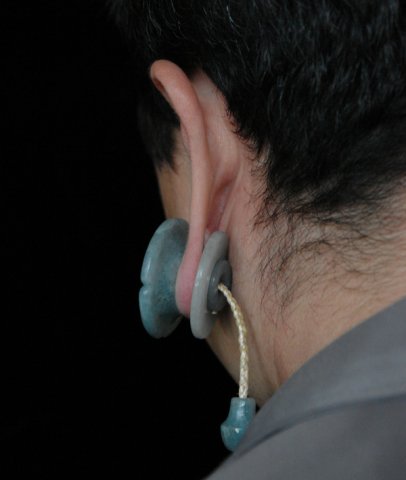
One of the beautiful things about this set to me is all of the details that most people will either never notice or aren't meant to notice unless they are shown. None of the retention or counterweight details are visible during either wear or display, which I think is fascinating because it is an incredible amount of effort which is essentially kept a secret between maker and wearer. I find simple function itself to be a beautiful thing, and I consider methods such as using the natural material as part of its own setting or retention to be wonderfully elegant.

If you'd like to see a short snippet of video about these pieces, they are featured at the beginning of this 4:30 mini-documentary on YouTube about Onetribe and myself. It shows the pieces in-hand from multiple views and how the retention system works.
I am thankful to Sergio for the opportunity to create this project, and to my staff and friends for encouraging me along the way and allowing me to bounce construction ideas off of them. Over the four years they took to make, I learned a huge amount about jade, Mesoamerican culture, and most importantly, myself while I was working on these pieces. I'm told they are easy to use, balance perfectly and are very comfortable to wear. Upon hearing this news, I am extremely satisified with the end result. I have had my maker's experience - my process - and now it is Sergio's turn to continue the story.

Jared A. Karnes
Update: Sergio was kind enough to have some great photographs taken showing the pieces being worn! We are thrilled to see these pieces in action.